自製已認證的韌體IPWS教學
Step One:Extract the downloaded rar file, and double click the iFaith.exe file.
第一步:解壓縮檔案並開啟iFaith.exe
Step Two:A disclaimer will appear. Read the notice and click ok to proceed.
第二步:會出現些宣示告知.閱讀完,就繼續下去吧.
Step Three:Click the Dump SHSH Blobs button
第三步:請按下Dump SHSH Blobs 按鈕

Step Four:Read the information and click Proceed when you are ready.
第四步:閱讀相關資訊,若您已熟悉內容,請按下一步.

Finally, click the Let’s Go! button to start the dumping process
最後,點下Let’s Go! 按鈕開始進行導出過程

Step Five:If you are dumping an Apple TV 2, indicate it when iFaith asks you
第五步:如果您是導出Apple TV 2,請依指示詢問回答

Step Six:Follow the DFU Instructions to place your device in DFU Mode. You can find more on entering DFU mode here.
第六步:請依DFU教學將您裝置進入DFU模式.您再點完後,下面會有提是如何進入DFU.

Press Power and home for 10 Seconds
同時按壓Power and home 持續10秒

Release the power button, but keep holding the Home
放開Power但持續按住home

Once Successful, iFaith will dump the SHSH of your current firmware. It will go through each step which could take a few minutes.
一旦成功,iFaith將開始從您目前韌體導出SHSH.可能會花一點時間進行.

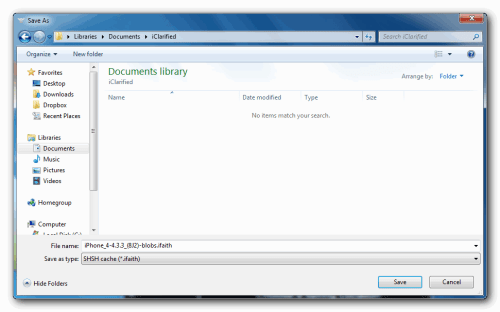
Step Seven:When completed, iFaith will ask you where to locally save the SHSH.
第七步:當完成,iFaith將會問您要將SHSH存放於哪個地方

Indicate where you want to save the SHSH file.
指示他您要存放SHSH於電腦哪個地方
最後產生一個.ifaith 檔案,同時傳一份到ih8sn0w伺服器上備份。
例如 iPhone4備份4.3.3韌體,所以檔名如 00000XXXXXXX_4.3.3_(8J2)_blobs.ifaith
請注意,這裡備份出來副檔名是.ifaith與小雨傘備份.shsh不同,因此您要刷回也是透過iFaith,請參考下方教學.
Q:小雨傘備份shsh blobs可否與iFaith備份共用?
答:可以,只要將小雨傘備份後xxx.shsh的副檔名shsh改成ifaith即可使用.
Step Eight:iFaith will notify you that the process was successful
第八步:iFaith將會提醒您已完成備份SHSH,請您回到主畫面後,使用您備份Blobs製作認證過的IPSW韌體.

第九步:點選Build signed IPSW.

第十步:跳出載入XXXX.ifaith檔案
& 可使用tinyumbrella SHSH

第十一步:選擇已下載韌體,或是選擇下載韌體

第十二步:如目前4.3.3韌體,請準備或下載好4.3.3韌體

開始認證IPSW

第十三步:認證完,請點及Build IPSW

將韌體與認證資料結合,建立已認證過的韌體(預設路徑:桌面)


")
 發表於 11-8-21 01:22 PM

 發表於 11-8-23 07:57 AM


